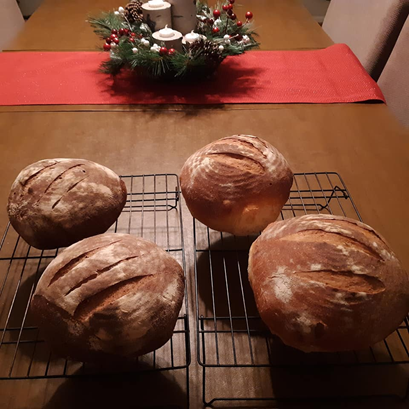
OK I will confess I had to make a lot of Sourdough bread before I made good ones most of the time. As far as simple, the ingredients are—Starter= water+flour+air+time. The process however is probably the longest (not difficult) one I can think of. I make Sourdough for home and friends every 4-5 weeks and because it is a time investment I usually make 4 loaves. I basically use Rose Levy Beranbaum’s process from “The Bread Bible” but have modified it to get consistently good bread. Recipes and Picture below.
Starter Ingredients
Equal parts flour and spring water by weight. It has been a long time since I started mine but would say 100 grams of each. If you do not have a kitchen scale (get one), you can measure by volume flour to water in a 2:1 ratio; 2/3 Cup Flour to 1/3 cup water. Use a whole grain flour to birth your starter, like whole wheat. Whole grain flours tend to have more wild yeast than all purpose flour. Use spring or bottled water. Chlorinated or fluoridated water will kill the yeast. Mix in a glass or plastic container (no metal tools, EVER!) mix with a wooden spoon or rubber spatula until smooth. Wrap in plastic wrap and let sit in a cool place for 48 hours. After 2 days you may have some bubbles on the surface. This is a good sign that your culture is developing. Give your starter a good stir with a clean tool. I use a rubber spatula. Now the hard part dump 1/3 to ‘1/2 of the starter down the drain. Add flour and water again 2:1 ratio by volume or equal weight and stir until smooth and cover and leave at room temp for 24 hours. Day 4 repeat day 3 by stirring, dumping and adding flour and water. This time cover with plastic but do it loosely, so gases can escape. Again, store at room temperature for 24 hours. On day five you may have starter that has tripled in volume. If so, have active starter. If not, do not worry continue with the stir dump and add process. You will get there eventually. If you have active starter you can make bread with some of it, but you will not have much of a sour taste as that takes more time to develop. For space consideration in the refrigerator, I moved my starter to a wide mouth canning jar. Early on the starter will need fed (stir, dump, feed) 3 times a week. Once it has developed 1-2 times a week is fine.
Feeding the starter
- Remove from frig.
- Let set at room temp for 30 min.
- Dump up to half down the drain.
- Add all-purpose flour and water (equal weight or 2:1 by volume) cover
- Let set on counter 30 min. (should see bubbles)
- Place back in frig. This part is important. The cold air slows the feeding process down and creates a liquid by product that is acidic. Until you are making bread we pour this off during feeding because the acid can kill the yeast, but when making bread I stir it in to add to the sour taste.
Finally making bread. Day1 Makes 2 round loaves or 1 big long loaf
- On a feeding day, remove from frig and let sit for 30 min.
- Stir the starter to incorporate the liquid on top and deflate mixture.
- I a glass bowl add 125 grams (g), 50 g AP flour and 50 g spring water.
- Mix until smooth, cover with plastic and store on top of refrigerator (warm and out of the way).
- Repeat steps 3 and 4 if making multiple batches of bread.
- At this point feed the starter you have left in the jar following steps 4-6 above.
- Wait 6 to 8 hours. Should be double in size.
- Second feeding- to you bowl add 150 g of AP flour and 150 g spring water.
- Mix until smooth, cover with plastic and store on top of refrigerator (warm and out of the way).
- After 6 hours you should be doubled in size again. Decision time- stay up all night making bread or put in frig. and use within 20 hours. I go to bead
Day 2
- Remove bowl from frig. Let set at room temp 1 hour. So, get your coffee on!
- About 30 minutes into the wait time, I start pulling out my ingredients.
- 500 g Bread flour
- 250 g spring water
- 16 g kosher salt
- 1/2teaspoon sugar
- 1/2teaspoon dry yeast (yes, the yeast is the modification part I mentioned earlier)
- Canned cooking spray and extra flour for dusting.
- At the 45-minute mark I heat my spring water in the microwave oven at full power for 20 seconds. To the warmed water I add my yeast and sugar. Give it a stir and set aside.
- Once the starter has come to room temperature transfer 500g to a second bowl (or use all of it in the original bowl). If you use all of it, you may have to add more or less flour later. As a beginner use a second bowl.
- Add Bread flour in a pile on tope of the starter. Add the salt evenly over the flour.
- Starting at one side pour about half the yeast water in the bowl and start mixing everything together. Once the water is gone add the balance of the yeast water with a swirl to get everything out of the container. Mix again until incorporated.
- Flour your work surface (bench) and dump the bowl out. Spray your hands with cooking spray and start working the dough. Don’t be surprised how the water comes back out from somewhere. Work the dough until smooth.
- Spray a clean bowl with cooking spray and place dough in the bowl, cover with plastic and place on top of frig.
- Clean up bench and put away ingredients.
- Let dough rest 1 hour.
- Dust bench and dump dough out. Knead the dough slightly and stretch it (think pizza guy) until thin. Fold the dough onto itself a few times until you get back to a ball. Put ball of dough back into the greased bowl and cover. Back on top of the frig.
- Let rest 1 hour.
- Repeat step 11. Stretch and fold. Bowl- cover -store on top of the frig.
- Let proof until double in size 4-5 hours.
- Dust bench. Carefully dump dough onto the bench. If making round loaves (boules) cut in half. Take the cut edge and tie it back on itself without totally deflating dough. Place in a cloth lined shaping bowl (banneton) sealed edge up, dust with flour and cover with cloth to rise. If making a long big loaf (batard), work your dough to long fat oblong shape, place in a suitable shaped cloth lined container, dust with flour and cover.
- Let dough rise at room temp. 3-4 hours.
- Preheat oven to 475 F. If you have a pizza stone, place it on a rack in the lower middle space in the oven. Place a small oven proof skillet (like cast iron) placed on a rack under your baking level rack.
- Get a cup with 3/4to a cup of ice cubes ready
- Prepare a heavy baking sheet (I do not use air back sheets) with parchment. When the oven is hot, carefully (do not deflate) turn your dough out of it’s shaping container onto the baking sheet. With a sharp knife slash your signature design on top. Be quick with this or watch your work deflate. Open oven and place baking sheet on the pizza stone. Quickly add the ice to the skillet and close the door. The steam from the skillet give you your crust. Note: if you don’t have a pizza stone, invert a second baking sheet on the rack.
- Bake 5 minutes at 475 F. after 5 minutes turn the oven down to 450 F and bake 10 minutes.
- Carefully open oven door and with oven mitts remove baking sheet. Put loaves back on the baking stone and continue baking 10 minutes for standard sourdough and 15 for rye sourdough.
- When time is up, insert an instant read thermometer in one of the loaves, should read north of 200F and be close to 210 F. If you are north of 200 F remove loaves from the oven and place on a cooling rack.
- Let loaves set on rack until cool. This is hard to do since your house smells like fresh bread, but if you don’t, you get a doughy center in the bread.
- Once cooled store in the frig. Loaves can last up to 4 weeks in the frig. Sourdough enzymes don’t allow bread mold to grow either. Yeah it feels like 524 steps, but it is like golf at first you hate it but keep coming back. Once you find your groove, you love it and don’t mind the early tee time. Pictured 2 rye and two regular sourdough